
How to Open Slim PS2 (SCPH 700XX)
Opening your PS2 requires that you remove the warranty label. Removal of this label will VOID YOUR WARRANTY WITH SONY. With that said, below are the directions for opening your slim ps2. CLICK HERE for SLIM PS2 PARTS.
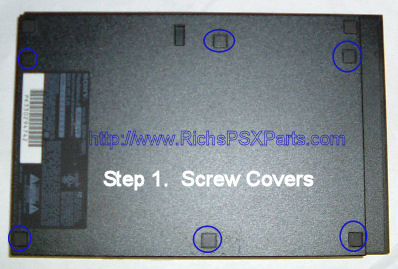 |
Step 1. Pry off the screw covers with a fingernail or small flat head screwdriver. You will need a Phillips #0 screwdriver to remove the screws underneath. Don't have one? We sell a set of small screwdrivers to open the slim ps2 for $3.95, free shipping. Click HERE to buy them. |
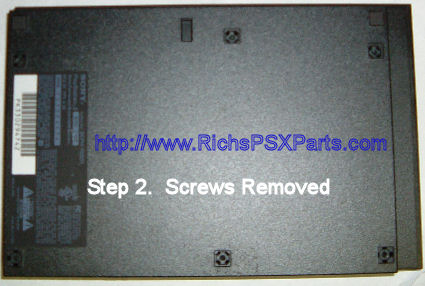 |
Step 2. This is a picture of the slim ps2 with the screw covers pryed and the 6 silver screws removed. |
 |
Step 3. When removing the case, you MUST lift from the back LEFT as shown in the picture. If you do not remove it like this, you risk damaging the reset switch inside the system which is under the area circled in yellow. The part is almost impossible to find, so be very careful! This is also how you should replace the case -- being VERY careful with the eject switch. It is a very fragile part. |
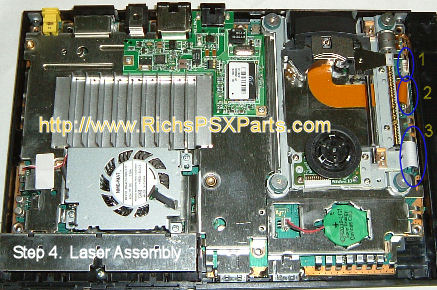 |
Step 4. Great, now the ps2 is
open. To replace the laser, there are four screws holding it down.
They are silver scews with big heads. You will need the same
Phillips #1 screwdriver to remove them. After you remove them, you
will need to remove: 1. The
worm motor cable 2. The laser cable does NOT need to be removed on this end, although, some people may find it easier to do so. Bear in mind, the laser cable is adhered to the motherboard by some sticky substance. If you do remove it, you must make sure it is stuck back down properly so that it does not get in the way of the laser movement, thereby becoming damaged. |
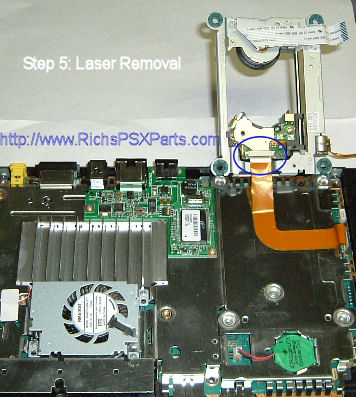 |
Step 5. This is how, personally, I remove the laser. It takes a little maneuvering to slip the laser cable into the laser like this, but after you've done a few hundred, you get used to it :-) ... the brown clip on the laser pries open so you can slide the laser cable inside then close it back. It's a bit tricky.. some may find it easier to just remove the laser cable from the motherboard, plug it into the laser, then back into the motherboard... but again, if you do this, MAKE SURE you adhere the cable back to the motherboard properly!!! |
And that's it! To put the laser back in and replace the PS2 top, just follow the directions in reverse order. Again, when replacing the top of the PS2, pay close attention to the eject switch on the inside. Make sure it is properly seated before you put the top of the case back on. Make sure you put the top of the case on by the eject button corner first!!!! If you break this switch, your slim PS2 is no good anymore because it is a very rare, hard to find part!!!
If you do not feel comfortable doing the repair yourself after reading this, DON'T. We provide most PS2 repairs on the slim model for $59.95 and less, that includes parts, labor, and shipping. If you've opened the PS2, the repair costs may be higher if anything inside was damaged. CLICK HERE FOR A REPAIR ESTIMATE.
Questions? Comments? Need help ordering?

| WE APPRECIATE YOUR BUSINESS! |
|