
Nintendo DS Top LCD Replacement
| To perform this repair, you will need a small flat instrument such as a jeweler's flathead screwdriver, and a tiny phillips jeweler's screwdriver. If you have neither, you can see the URL below to purchase a set from us. | |
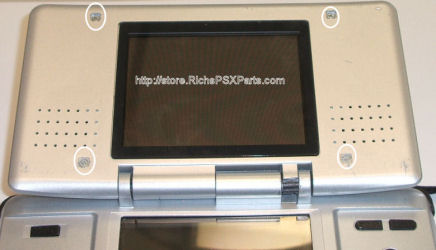 |
You must first pry the 4 square pieces from the casing to expose the 4 tiny screws you must remove to remove the top half of the casing. Pop off the rubber squares and remove the 4 screws. |
 |
Then Pry casing apart. |
 |
Remove the top half of the casing to expose the LCD and the circuit board to which it is connected. On the NDS, the circuit board is under the top, so it makes it pretty simple. |
 |
Remove the tiny screw holding the circuit board in place and remove the circuit board. Remove the two cables connecting the LCD to the circuit board. |
 |
After the circuit board is removed, gently pry the LCD from the top casing of the DS. |
| Re-Install the LCD by reversing the directions above! | |
Questions? Comments? Need help ordering?

| WE APPRECIATE YOUR BUSINESS! |
|