PSP-1001 LCD Replacement Instructions
 |
Rich's Tool of choice -- a #00 Flathead Philips Precision Screwdriver
(to pry the LCD from the unit). |
 |
You must first remove the control
buttons on the bottom of the LCD. |
 |
Then Pry the lower left of the LCD out
of the PSP. |
 |
Then Pry the other side of the LCD |
 |
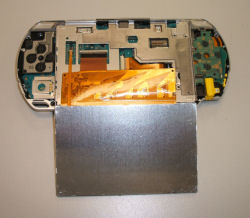
Lift the LCD from the PSP by pulling the
top downward as shown in this picture. |
| I cannot begin to
express the importance of the next step. If you do not feel
comfortable with the delicate nature of the next step for any reason --
STOP NOW, PUT YOUR PSP BACK TOGETHER AND SEND IT TO US TO BE REPAIRED.
We charge only $20 more to install the LCD and ship the PSP back to you.
Every day we receive emails from people who broke the clips on their
motherboard in the next step. If the clips are broken, your PSP
cannot be fixed. PLEASE, IF YOU DO NOT FEEL COMFORTABLE WITH THE
NEXT STEP, CONSIDER SENDING YOUR PSP TO US TO BE FIXED!!!
CLICK
HERE FOR THE FORM TO INCLUDE WITH YOUR PSP IF YOU SEND IT TO US |
 |
To remove the LCD completely, GENTLY
pry/lift this clip up so the LCD ribbon slides out. Be careful as
this part is fragile and if you damage it, your PSP is pretty much
useless. The backlight ribbon just pulls out of the motherboard
connector. YOU MUST PULL GENTLY!!! Do Not Tug on any cables in the
PSP. |
 |
The backlight and LCD are shows as one
unit. The backlight's ribbon is shown on the left, the LCD on the
right. |
| |
Re-Install the LCD by reversing the
directions above! |
 Regular price: $6.95 Sale price: $4.95 |  Regular price: $39.95 Sale price: $14.95 |  Regular price: $64.95 Sale price: $39.95 |
 Regular price: $50.00 Sale price: $39.95 |
Questions? Comments? Need help ordering?

| WE APPRECIATE YOUR BUSINESS! |
- . Thank you for your continued patronage!
- Serving the Gaming Community since 2002!
- Save Gas! Shop Online!
RichsPSXParts.com offers $3.95 Shipping for U.S., $8.95 for Canada
orders. Only $10.95 for International orders! Shipping upgrades also available
- Click HERE for Shipping Information!
|


